Table of Contents
Discover how to create your own DIY rustic farm table and bring a touch of country charm to your home. Learn step-by-step instructions, from choosing the right materials to assembling and finishing your table. Create a cozy and inviting space for family gatherings with this timeless piece of furniture.
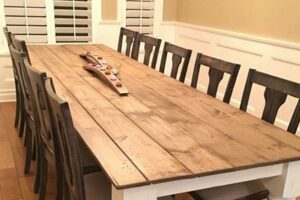
If you’re looking to add a touch of rustic charm to your dining room, there’s nothing quite like a DIY rustic farm table. With its timeless appeal and natural beauty, this type of table can instantly transform any space into a cozy and inviting gathering spot. Whether you’re hosting a dinner party or enjoying a casual family meal, a rustic farm table provides the perfect backdrop for memorable moments. Plus, the best part is that you can easily create your own unique piece by following a few simple steps. So, if you’re ready to roll up your sleeves and embark on a rewarding woodworking project, let’s dive into the world of DIY rustic farm tables!
Introduction
If you’re looking to add a touch of rustic charm to your home, a DIY rustic farm table is the perfect project. Not only does it provide a functional and stylish piece of furniture, but it also allows you to showcase your creativity and woodworking skills. In this article, we will guide you through the process of building your own rustic farm table, step by step.
Gathering Materials
Choosing the Right Wood
The first step in building a rustic farm table is selecting the right wood for your project. Opt for reclaimed wood or lumber with a weathered appearance to achieve an authentic rustic look. Popular choices include oak, pine, and cedar. Make sure to measure the dimensions you desire for your table and purchase enough wood accordingly.
Essential Tools
To successfully complete this DIY project, you’ll need several essential tools. These include a circular saw, a power drill, a sander, a tape measure, clamps, and a chisel. It’s always a good idea to have safety goggles, gloves, and ear protection on hand as well.
Table Construction
Preparing the Wood
Before starting the construction process, it’s crucial to prepare the wood properly. Begin by removing any existing paint or varnish using a sander. Then, cut the wood into the desired lengths and widths for the table’s top and legs. Sand all the surfaces until smooth to avoid any splinters.
Building the Tabletop
Start assembling the tabletop by attaching the planks together using pocket holes or wood glue. Ensure that the edges are aligned correctly and use clamps to hold them in place while the adhesive dries. Once the glue has set, reinforce the joints with screws for added stability.
Constructing the Legs
Now it’s time to build the table’s legs. Cut four equal-sized pieces of wood to your preferred height and angle the ends to create a farmhouse-style look. Attach the legs to the tabletop, ensuring they are evenly spaced and securely fastened.
Stabilizing the Table
To prevent wobbling and ensure the table’s stability, add additional supports underneath the tabletop. These can be achieved by attaching wooden braces or metal brackets between the legs. Be sure to measure carefully to ensure a level surface.
Finishing Touches
Sanding and Smoothing
Once the construction is complete, it’s time to give your rustic farm table a professional finish. Use sandpaper or an electric sander to smooth out any rough edges or imperfections. This step will also help to enhance the rustic appeal of the table.
Staining or Painting
Next, choose whether you want to stain or paint your table. Staining brings out the natural beauty of the wood grain and adds depth to its rustic charm. Alternatively, painting the table can add a pop of color or complement the existing decor in your home.
Applying a Protective Finish
To protect your table from daily wear and tear, apply a protective finish such as polyurethane or wax. This will also enhance the table’s durability and make it easier to clean. Follow the instructions on the product carefully for the best results.
Enjoying Your DIY Rustic Farm Table
Decorating the Table
Now that your DIY rustic farm table is complete, it’s time to decorate it to match your personal style. Consider placing a centerpiece, such as a vase of fresh flowers or a decorative bowl, to add a touch of elegance. Additionally, you can adorn the table with table runners, placemats, or other accessories to create a warm and inviting atmosphere.
Gathering Around the Table
One of the joys of having a rustic farm table is the ability to gather friends and family around it for meals, games, or heartfelt conversations. Enjoy the fruits of your labor by hosting memorable gatherings and creating cherished moments around your handmade masterpiece.
Conclusion
Building your own DIY rustic farm table is a rewarding project that allows you to bring a piece of timeless charm into your home. By following these steps and using your creativity, you can create a stunning centerpiece that will be the envy of all your guests. So roll up your sleeves, gather your tools, and get ready to embark on this fulfilling journey of craftsmanship.
DIY Rustic Farm Table: A Beautiful Addition to Your Home
Transform your dining space into a cozy and inviting area with a DIY rustic farm table. By following these step-by-step instructions, you can enjoy the satisfaction of creating a unique piece of furniture that blends seamlessly with various interior styles, adding a touch of warmth and character to your home.
Choosing the Right Materials
To build a durable and authentic rustic farm table, opt for wood planks with a distressed or weathered look. Pine or reclaimed barn wood are excellent choices as they provide the perfect rustic charm. Consider the dimensions of the table and the number of guests it will accommodate before purchasing the wood.
Preparing the Wood
Start by measuring and cutting the wood planks to the desired size using a miter saw. If you prefer a more distressed appearance, you can create indentations and uneven edges using a hammer or a wire brush. Sand the planks thoroughly to ensure a smooth surface for staining or painting.
Assembling the Tabletop
Lay the prepared planks on a flat surface, arranging them side by side with even gaps between them. Use clamps or wooden dowels to hold the planks together while attaching them with screws from underneath. This ensures a sturdy and seamless tabletop that can withstand everyday use.
Constructing the Table Legs
For a classic rustic look, using turned or tapered wooden legs is ideal. Measure and cut the legs to the preferred height, ensuring they match the length of the tabletop. Attach them securely using screws or metal brackets, providing stability and balance to the table.
Adding Support and Stabilization
To prevent warping or wobbling, attach support beams between the legs. These can be as simple as wooden boards attached diagonally from one leg to another. Secure the beams to the legs and tabletop using screws or metal brackets, creating a solid foundation for your farm table.
Finishing Touches
To enhance the rustic charm of your DIY farm table, consider staining or painting it in your preferred shade. Apply multiple coats of a sealant or polyurethane to protect the wood from daily wear and tear. You can also distress the table further with sandpaper for an aged appearance.
Enjoying Your DIY Farm Table
Once your rustic farm table is complete and has had sufficient time to dry, proudly display it in your dining area and enjoy the cozy, farmhouse-inspired ambiance it adds to your home. Gather your loved ones around this beautiful piece of furniture and create lasting memories over delicious meals.
Note: The above instructions are provided as a general guide. It’s essential to adapt the steps to your specific needs and skill level. Always prioritize safety while working with tools and machinery, and consult professionals if needed.
As a professional, I would like to share my point of view on the topic of DIY rustic farm tables. Rustic farm tables have gained immense popularity in recent years due to their timeless appeal and versatility in various interior design styles. Building your own rustic farm table can be a rewarding and fulfilling project, allowing you to create a unique piece of furniture that fits your personal taste and style.
Here are a few points to consider when undertaking a DIY rustic farm table project:
- Sourcing high-quality materials: To ensure the durability and longevity of your rustic farm table, it is essential to source high-quality materials. Opt for solid wood such as oak, pine, or walnut, which not only adds to the authenticity of the design but also provides sturdiness and stability.
- Accurate measurements and planning: Before starting the construction process, it is crucial to have accurate measurements and a well-thought-out plan. This includes determining the desired dimensions of the table, considering the available space, and ensuring proper proportions. Taking the time to plan ahead will help you avoid unnecessary mistakes and achieve a polished end result.
- Investing in proper tools: Building a rustic farm table requires a range of tools, including a saw, drill, sander, and clamps, among others. It is important to invest in high-quality tools that can handle the demands of the project. Having the right tools at your disposal will not only make the construction process smoother but also contribute to the overall quality of the final product.
- Applying suitable finishing techniques: The finishing touches play a significant role in enhancing the rustic charm of the farm table. Consider using techniques such as distressing, staining, or applying a weathered finish to create an aged and worn look. These techniques can add character to the table and make it appear as if it has been passed down through generations.
- Considering maintenance and care: It is essential to keep in mind that rustic farm tables, while beautiful, may require regular maintenance and care. Wood is susceptible to scratches, stains, and moisture damage, so it is recommended to use protective coatings or sealants to prolong the lifespan of the table. Additionally, be mindful of placing hot items or sharp objects directly on the surface to prevent damage.
Building a DIY rustic farm table can be a gratifying experience, allowing you to showcase your craftsmanship and creativity. However, if you feel unsure about your woodworking skills or lack the necessary tools, it is advisable to seek professional assistance to ensure a successful and beautifully finished project.
Thank you for visiting our blog and taking the time to read our article on how to create your own DIY Rustic Farm Table. We hope that you have found the information and instructions provided helpful and inspiring. Creating a beautiful and functional piece of furniture like a farm table can be a rewarding and enjoyable project, and we are thrilled to be able to share our tips and expertise with you.
Throughout this article, we have outlined the step-by-step process of building your own DIY Rustic Farm Table, from selecting the right materials to assembling and finishing the final product. We have included detailed instructions and helpful tips to guide you through each stage, ensuring that even those with minimal woodworking experience can successfully complete this project.
We understand that embarking on a DIY project can be daunting, especially if you are a beginner. However, we believe that with the right guidance and a little bit of patience, anyone can create a beautiful and functional piece of furniture. Building your own DIY Rustic Farm Table not only allows you to customize the design and dimensions to perfectly suit your space, but it also provides a sense of accomplishment that comes with creating something with your own hands.
In conclusion, we would like to thank you once again for visiting our blog and reading our article on DIY Rustic Farm Tables. We hope that the information and instructions provided have inspired you to take on this exciting project. Remember, the key to success is to take your time, follow the instructions carefully, and enjoy the process. Building your own furniture can be a truly rewarding experience, and we wish you the best of luck in creating your own beautiful and unique DIY Rustic Farm Table!
Video Diy Rustic Farm Table
People also ask about DIY Rustic Farm Tables:
-
What materials do I need to build a DIY rustic farm table?
Building a DIY rustic farm table typically requires the following materials:
- Wooden planks for the tabletop
- Lumber for the table legs and frame
- Screws or nails for assembly
- Wood glue
- Sandpaper for smoothing the surfaces
- Stain or paint for finishing
- Optional: tools such as a saw, drill, and sander
-
What are the steps to build a DIY rustic farm table?
To build a DIY rustic farm table, follow these general steps:
- Gather all the necessary materials and tools.
- Measure and cut the wooden planks for the tabletop according to your desired dimensions.
- Assemble the tabletop by joining the planks together using screws or nails.
- Measure and cut the lumber for the table legs and frame.
- Attach the legs to the tabletop using screws or other appropriate hardware.
- Construct the frame by attaching the lumber pieces together.
- Sand any rough edges or surfaces to achieve a smooth finish.
- Apply a stain or paint of your choice to protect and enhance the rustic look of the table.
- Allow the table to dry completely before using it in your space.
-
Can I customize the size and design of a DIY rustic farm table?
Yes, one of the advantages of building a DIY rustic farm table is the ability to customize its size and design according to your preferences. You can choose the dimensions of the tabletop and adjust the height and width of the table legs to fit your specific needs. Additionally, you can experiment with different finishes and decorative elements to create a unique look that matches your style and home decor.
-
How long does it take to build a DIY rustic farm table?
The time required to build a DIY rustic farm table can vary depending on your skill level, familiarity with tools, and the complexity of the design. Generally, it can take anywhere from a few days to a couple of weeks to complete the project. It’s important to allocate enough time for measuring, cutting, assembling, sanding, and finishing the table to ensure a high-quality result.
-
What are some tips for building a sturdy DIY rustic farm table?
To build a sturdy DIY rustic farm table, consider the following tips:
- Choose solid and durable wood for the tabletop and frame.
- Ensure proper support by using strong table legs and a well-constructed frame.
- Use appropriate hardware such as screws or nails to secure the components firmly.
- Apply wood glue to reinforce joints for added stability.
- Follow accurate measurements and use precise cutting techniques for a tight fit.
- Sand all surfaces thoroughly to prevent splinters and achieve a smooth finish.
- Consider adding additional braces or supports underneath the tabletop for extra strength.