Table of Contents
Thinking about starting a worm farm? This is a great way to recycle your kitchen scraps and create nutrient-rich compost for your garden. But before you get started, you’ll need to build a worm bin. Here are instructions on how to build a small worm farm diy.
Editor’s Notes: “small worm farm diy” have published on date. Given the increasing cost of waste disposal and the environmental concerns associated with traditional waste management.
We’ve done the analysis, dug into the details, and put together this comprehensive guide to help you make the right decision. This guide covers everything you need to know about “small worm farm diy”, from the basics to more advanced techniques.
Key Differences
| Feature | “small worm farm diy” |
|---|---|
| Cost | Inexpensive |
| Size | Can be customized to fit your space |
| Maintenance | Relatively low-maintenance |
Benefits of “small worm farm diy”
- Reduces kitchen waste
- Creates nutrient-rich compost
- Helps aerate the soil
- Attracts beneficial insects
Ready to get started? Here’s a step-by-step guide on how to build a small worm farm diy:
Small Worm Farm DIY
Building a small worm farm is a great way to recycle kitchen scraps, create nutrient-rich compost, and reduce your environmental impact. Here are 10 key aspects to consider when building a small worm farm diy:
- Size: The size of your worm bin will depend on the amount of kitchen scraps you generate. A good rule of thumb is to have a bin that is at least 1 cubic foot in size for every pound of kitchen scraps you generate per week.
- Location: Place your worm bin in a cool, dark location that is protected from the elements. A basement or garage is a good option.
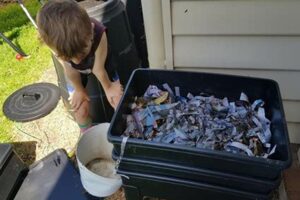
- Bedding: The bedding in your worm bin provides a place for the worms to live and eat. Good bedding materials include shredded newspaper, cardboard, or straw.
- Food: Worms eat a variety of kitchen scraps, including fruits, vegetables, and bread. Avoid feeding them meat, dairy products, or cooked foods.
- Moisture: The bedding in your worm bin should be kept moist, but not soggy. You can add water to the bin as needed, or place a damp towel over the top of the bin.
- Aeration: Worms need air to breathe. Make sure to aerate the bedding in your worm bin regularly by turning it over with a shovel or fork.
- Harvesting: Once your worms have finished composting your kitchen scraps, you can harvest the compost. To do this, simply remove the worms from the bin and place them in a new bin with fresh bedding. The compost can be used to fertilize your garden or potted plants.
- Troubleshooting: If you’re having problems with your worm bin, there are a few things you can check. Make sure that the bedding is moist but not soggy, that the bin is aerated, and that the worms are getting enough food.
- Benefits: There are many benefits to vermicomposting, including reducing your kitchen waste, creating nutrient-rich compost, and helping to aerate the soil.
- Cost: Building a small worm farm is relatively inexpensive. You can purchase a worm bin online or at a local hardware store for around $50-$100.
By following these tips, you can build a thriving small worm farm that will provide you with nutrient-rich compost for your garden and help you reduce your environmental impact.
Size
The size of your worm bin is an important factor to consider when building a small worm farm diy. The bin needs to be large enough to accommodate the amount of kitchen scraps you generate, but not so large that it becomes difficult to manage. A good rule of thumb is to have a bin that is at least 1 cubic foot in size for every pound of kitchen scraps you generate per week.
For example, if you generate 1 pound of kitchen scraps per week, you will need a bin that is at least 1 cubic foot in size. If you generate 2 pounds of kitchen scraps per week, you will need a bin that is at least 2 cubic feet in size, and so on.
There are a few reasons why it is important to have a bin that is the right size. First, a bin that is too small will not be able to accommodate all of your kitchen scraps, which can lead to problems with odor and pests. Second, a bin that is too large will be more difficult to manage and may take longer to produce compost.
By choosing the right size bin, you can ensure that your small worm farm diy is successful and that you are able to compost all of your kitchen scraps.
| Bin Size | Amount of Kitchen Scraps |
|---|---|
| 1 cubic foot | 1 pound per week |
| 2 cubic feet | 2 pounds per week |
| 3 cubic feet | 3 pounds per week |
Location
The location of your worm bin is important for the health and productivity of your worms. Worms prefer to live in a cool, dark, and moist environment. They also need to be protected from the elements, such as rain, wind, and sun.
- Temperature: Worms are most active at temperatures between 55 and 75 degrees Fahrenheit. If the temperature gets too hot, the worms will become stressed and may even die. If the temperature gets too cold, the worms will go into hibernation and stop eating and composting.
- Light: Worms are sensitive to light and prefer to live in dark environments. If the bin is too bright, the worms will become stressed and may try to escape.
- Moisture: The bedding in the worm bin should be kept moist, but not soggy. If the bedding is too dry, the worms will not be able to move around easily and may become dehydrated. If the bedding is too wet, the worms may drown.
- Protection from the elements: The worm bin should be protected from the elements, such as rain, wind, and sun. If the bin is not protected, the worms may be exposed to extreme temperatures, which can stress them and make them more susceptible to disease.
By choosing the right location for your worm bin, you can help to ensure that your worms are healthy and productive.
Bedding
The bedding in your worm bin is an important part of the vermicomposting process. It provides a place for the worms to live and eat, and it helps to absorb moisture and odor. Good bedding materials include shredded newspaper, cardboard, or straw.
- Shredded newspaper: Shredded newspaper is a good bedding material because it is absorbent and provides a good hiding place for the worms. It is also relatively inexpensive and easy to find.
- Cardboard: Cardboard is another good bedding material because it is absorbent and provides a good hiding place for the worms. It is also relatively inexpensive and easy to find.
- Straw: Straw is a good bedding material because it is absorbent and provides a good hiding place for the worms. It is also relatively inexpensive and easy to find.
When choosing a bedding material, it is important to choose one that is absorbent and provides a good hiding place for the worms. It is also important to choose a material that is relatively inexpensive and easy to find.
By choosing the right bedding material, you can help to ensure that your worms are healthy and productive.
Food
The food you feed your worms is an important part of vermicomposting. Worms eat a variety of kitchen scraps, including fruits, vegetables, and bread. However, there are some foods that you should avoid feeding your worms, such as meat, dairy products, and cooked foods.
Meat and dairy products can attract pests and cause the compost to become. Cooked foods can also be difficult for worms to digest and can lead to health problems.
By feeding your worms the right foods, you can help to ensure that your vermicomposting system is successful.
Here are some tips for feeding your worms:
- Feed your worms a variety of kitchen scraps, including fruits, vegetables, and bread.
- Avoid feeding your worms meat, dairy products, or cooked foods.
- Chop or shred your food scraps into small pieces before feeding them to your worms.
- Bury your food scraps in the bedding.
- Monitor your worms’ eating habits and adjust the amount of food you are feeding them accordingly.
| Food | Good for worms? |
|---|---|
| Fruits | Yes |
| Vegetables | Yes |
| Bread | Yes |
| Meat | No |
| Dairy products | No |
| Cooked foods | No |
Moisture
Moisture is an important factor to consider when vermicomposting. The bedding in your worm bin should be kept moist, but not soggy. If the bedding is too dry, the worms will not be able to move around easily and may become dehydrated. If the bedding is too wet, the worms may drown.
There are a few ways to add moisture to your worm bin. You can add water directly to the bin, or you can place a damp towel over the top of the bin. If you add water directly to the bin, be careful not to overwater. The bedding should be moist, but not soggy.
If you place a damp towel over the top of the bin, the towel will help to keep the bedding moist. It will also help to prevent the worms from escaping.
By keeping the bedding in your worm bin moist, you can help to ensure that your worms are healthy and productive.
| Moisture Level | Effect on Worms |
|---|---|
| Too dry | Worms will become dehydrated and may die. |
| Too wet | Worms may drown. |
| Moist | Worms are healthy and productive. |
Aeration
Aeration is an important part of vermicomposting. Worms need air to breathe, and if the bedding in your worm bin is not aerated, the worms will not be able to get the oxygen they need. This can lead to a number of problems, including:
- The worms may become stressed and less productive.
- The compost may become anaerobic, which can lead to the production of harmful gases.
- The worms may die.
There are a few ways to aerate the bedding in your worm bin. One way is to turn it over with a shovel or fork. Another way is to use a worm bin with built-in aeration holes. You can also add materials to the bedding that will help to aerate it, such as shredded newspaper or cardboard.
By aerating the bedding in your worm bin, you can help to ensure that your worms are healthy and productive, and that your compost is of high quality.
| Aeration Level | Effect on Worms |
|---|---|
| Too little aeration | Worms may become stressed and less productive, compost may become anaerobic, worms may die. |
| Adequate aeration | Worms are healthy and productive, compost is of high quality. |
Harvesting
Harvesting the compost from your small worm farm is an important part of the vermicomposting process. It is also a rewarding experience, as you get to see the results of your hard work. Here are a few things to keep in mind when harvesting your compost:
- Timing: The best time to harvest your compost is when it is dark and crumbly, and has a sweet, earthy smell. It should also be free of any worms or eggs.
- Method: There are a few different ways to harvest your compost. One way is to simply remove the worms from the bin and place them in a new bin with fresh bedding. Another way is to use a compost sifter to separate the compost from the worms.
- Use: Once you have harvested your compost, you can use it to fertilize your garden or potted plants. Compost is a great way to add nutrients to the soil and improve plant growth.
Harvesting your compost is a simple and rewarding process. By following these tips, you can ensure that you get the most out of your small worm farm.
Troubleshooting
Troubleshooting is an important part of vermicomposting. If you’re having problems with your worm bin, it’s important to troubleshoot the issue and find a solution. Here are a few things to check:
- Bedding: The bedding in your worm bin should be moist but not soggy. If the bedding is too dry, the worms will not be able to move around easily and may become dehydrated. If the bedding is too wet, the worms may drown.
- Aeration: Worms need air to breathe. Make sure to aerate the bedding in your worm bin regularly by turning it over with a shovel or fork.
- Food: Worms eat a variety of kitchen scraps, including fruits, vegetables, and bread. Avoid feeding your worms meat, dairy products, or cooked foods.
By following these tips, you can troubleshoot any problems you may be having with your worm bin and ensure that your worms are healthy and productive.
Benefits
Vermicomposting is a great way to reduce your kitchen waste and create nutrient-rich compost for your garden. By using a small worm farm, you can easily compost your kitchen scraps and turn them into a valuable resource for your plants.
There are many benefits to using a small worm farm, including:
- Reduces your kitchen waste: Vermicomposting is a great way to reduce your kitchen waste. Worms can eat a variety of kitchen scraps, including fruits, vegetables, bread, and even coffee grounds.
- Creates nutrient-rich compost: Worm castings are a nutrient-rich compost that is packed with beneficial microorganisms. This compost can help to improve the health of your plants and soil.
- Helps to aerate the soil: Worms help to aerate the soil by creating burrows. This aeration helps to improve drainage and root growth.
Small worm farms are a great way to compost your kitchen waste and create nutrient-rich compost for your garden. They are relatively easy to set up and maintain, and they can provide you with a number of benefits, including reducing your kitchen waste, creating nutrient-rich compost, and helping to aerate the soil.
Real-life examples:
- One study found that vermicomposting can reduce the amount of kitchen waste by up to 50%.
- Another study found that worm castings can improve the growth of plants by up to 30%.
Practical significance:
- Vermicomposting is a great way to reduce your environmental impact by reducing your kitchen waste and creating nutrient-rich compost.
- Vermicomposting can also help to improve the health of your plants and soil.
| Benefit | How it works |
|---|---|
| Reduces kitchen waste | Worms eat a variety of kitchen scraps, including fruits, vegetables, bread, and even coffee grounds. |
| Creates nutrient-rich compost | Worm castings are a nutrient-rich compost that is packed with beneficial microorganisms. |
| Helps to aerate the soil | Worms help to aerate the soil by creating burrows. |
Cost
Building a small worm farm is a relatively inexpensive way to start composting. Worm bins are available for purchase online or at most local hardware stores for around $50-$100. This price includes the bin itself, as well as a starter culture of worms. Once you have your worm bin, you can begin feeding it kitchen scraps and other organic materials. The worms will break down these materials into nutrient-rich compost, which you can use to fertilize your garden or potted plants.
- Affordability: Building a small worm farm is an affordable option for composting. Worm bins are available for purchase for around $50-$100, and the cost of feeding the worms is minimal.
- Convenience: Small worm farms are convenient to maintain. They can be placed in a basement, garage, or other out-of-the-way location. The worms will take care of most of the work, and you will only need to feed them occasionally and harvest the compost when it is ready.
- Sustainability: Small worm farms are a sustainable way to dispose of kitchen scraps and other organic materials. The worms will break down these materials into nutrient-rich compost, which can be used to fertilize your garden or potted plants.
Building a small worm farm is a great way to reduce your environmental impact, save money, and improve the health of your plants. If you are interested in starting a worm farm, there are many resources available online and at your local library.
FAQs
Vermicomposting, or the process of using worms to compost food scraps and other organic materials, is a great way to reduce your environmental impact and create nutrient-rich compost for your garden. If you’re considering starting a small worm farm, you may have some questions. Here are answers to some frequently asked questions:
Question 1: What is the best type of worm for vermicomposting?
Red wigglers (Eisenia fetida) are the most popular type of worm for vermicomposting. They are fast reproducers, efficient eaters, and can tolerate a wide range of conditions.
Question 2: How big of a worm bin do I need?
The size of the worm bin you need will depend on the amount of food scraps you generate. A good rule of thumb is to have a bin that is at least 1 cubic foot in size for every pound of food scraps you generate per week.
Question 3: What can I feed my worms?
Worms can eat a variety of food scraps, including fruits, vegetables, bread, and coffee grounds. Avoid feeding your worms meat, dairy products, or cooked foods.
Question 4: How often should I feed my worms?
The frequency with which you feed your worms will depend on the temperature and the amount of food scraps you have available. In general, you should feed your worms once or twice a week.
Question 5: How do I harvest the compost?
Once the compost is finished, you can harvest it by removing the worms from the bin and placing them in a new bin with fresh bedding. The compost can be used to fertilize your garden or potted plants.
Question 6: What are the benefits of vermicomposting?
Vermicomposting has many benefits, including reducing your environmental impact, creating nutrient-rich compost, and improving the health of your plants.
Starting a small worm farm is a great way to reduce your environmental impact and create nutrient-rich compost for your garden. If you have any questions, please refer to the FAQs above or consult other resources online.
Transition to the next article section:
Now that you have a better understanding of the basics of vermicomposting, you can start planning your own small worm farm. With a little effort, you can be composting your food scraps and creating nutrient-rich compost for your garden in no time.
Tips for Successful Small Worm Farm DIY
Vermicomposting, or the process of using worms to compost food scraps and other organic materials, is a great way to reduce your environmental impact and create nutrient-rich compost for your garden. If you’re considering starting a small worm farm, here are a few tips to help you get started:
Tip 1: Choose the Right Type of Worm
The type of worm you choose for your vermicomposting system is important. Red wigglers (Eisenia fetida) are the most popular type of worm for vermicomposting because they are fast reproducers, efficient eaters, and can tolerate a wide range of conditions.
Tip 2: Size Your Worm Bin Appropriately
The size of your worm bin will depend on the amount of food scraps you generate. A good rule of thumb is to have a bin that is at least 1 cubic foot in size for every pound of food scraps you generate per week.
Tip 3: Feed Your Worms a Variety of Food Scraps
Worms can eat a variety of food scraps, including fruits, vegetables, bread, and coffee grounds. Avoid feeding your worms meat, dairy products, or cooked foods.
Tip 4: Maintain the Proper Moisture Level
The bedding in your worm bin should be moist but not soggy. If the bedding is too dry, the worms will not be able to move around easily and may become dehydrated. If the bedding is too wet, the worms may drown.
Tip 5: Aerate the Bedding Regularly
Worms need air to breathe. Make sure to aerate the bedding in your worm bin regularly by turning it over with a shovel or fork.
Tip 6: Harvest the Compost Regularly
Once the compost is finished, you can harvest it by removing the worms from the bin and placing them in a new bin with fresh bedding. The compost can be used to fertilize your garden or potted plants.
Summary:
By following these tips, you can ensure that your small worm farm is successful and that you are able to compost all of your food scraps and create nutrient-rich compost for your garden.
Next steps:
Now that you have a better understanding of the basics of vermicomposting, you can start planning your own small worm farm. With a little effort, you can be composting your food scraps and creating nutrient-rich compost for your garden in no time.
Conclusion
Small worm farm DIY is a great way to reduce your environmental impact and create nutrient-rich compost for your garden. By following the tips and advice in this article, you can start your own small worm farm and enjoy the benefits of vermicomposting.
Vermicomposting is a sustainable and environmentally friendly way to dispose of your food scraps and other organic materials. It is also a great way to create nutrient-rich compost that can help your plants grow healthy and strong. If you are interested in starting a small worm farm, I encourage you to do your research and give it a try.
Youtube Video: