Table of Contents
Tired of fruit flies buzzing around your kitchen? Looking for a sustainable and cost-effective way to reduce your environmental impact? Vermicomposting, the process of using worms to break down organic matter, is an excellent solution to both of these problems. Start your vermicomposting journey today with our comprehensive guide on how to make a DIY worm farm.
Editor’s Note: Our how-to guide on “how to make a worm farm diy” has been published today, giving you all the information you need to get started with vermicomposting. With its environmental and financial benefits, vermicomposting is a valuable practice for any eco-conscious individual.
To create this helpful guide, our team has thoroughly analyzed various methods and consulted with experts in the field. We are confident that our how-to guide will empower you to make an informed decision about starting your own worm farm.
Key Differences: DIY Worm Farm vs. Commercial Worm Bin
| Feature | DIY Worm Farm | Commercial Worm Bin |
|---|---|---|
| Cost | Less expensive | More expensive |
| Flexibility | Can be customized to fit specific needs and space constraints | Limited customization options |
| Materials | Often made from recycled or repurposed materials | Typically made from new materials |
Transition to Main Article Topics
In the following sections, we will delve into the step-by-step process of creating your own DIY worm farm, including choosing the right materials, preparing the bedding, and introducing the worms. We will also provide tips on maintaining your worm farm and troubleshooting common problems.
How to Make a Worm Farm DIY
Vermicomposting, the practice of using worms to break down organic matter, offers numerous benefits, including reducing waste, improving soil health, and creating nutrient-rich fertilizer. To help you get started with vermicomposting, we have identified nine key aspects of building a DIY worm farm:
- Materials: Repurposed containers, cardboard, wood
- Location: Indoors (temperature-controlled) or outdoors (protected from elements)
- Size: Determined by the amount of organic waste generated
- Bedding: Shredded paper, cardboard, or straw
- Worms: Red wigglers (Eisenia fetida) are ideal for composting
- Food: Fruit and vegetable scraps, coffee grounds, tea bags
- Moisture: Worms prefer a moist environment, but not soggy
- Aeration: Holes or slits in the container allow for oxygen flow
- Maintenance: Regular feeding, monitoring moisture, and harvesting castings
These aspects are interconnected and crucial for the success of your worm farm. Choosing the right materials and location ensures a suitable environment for the worms. Providing proper bedding, food, and moisture supports their health and activity. Aeration and maintenance practices promote optimal conditions for the composting process. Understanding these aspects will empower you to create a thriving worm farm that effectively transforms your organic waste into valuable compost.
Materials
In the context of DIY worm farming, the choice of materials for constructing the worm bin is of great importance. Repurposed containers, cardboard, and wood are commonly used due to their availability, affordability, and suitability for the purpose.
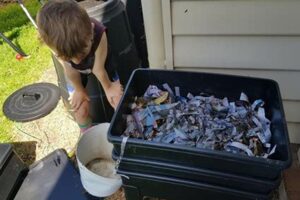
- Repurposed containers: Plastic storage bins, buckets, or even old bathtubs can be repurposed as worm bins. These containers are readily available, cost-effective, and provide a contained environment for the worms.
- Cardboard: Cardboard boxes can be used to create temporary or small-scale worm bins. Cardboard is biodegradable and provides insulation, but it requires more frequent maintenance and replacement compared to other materials.
- Wood: Wooden crates or pallets can be used to build sturdy and durable worm bins. Wood is a natural material that allows for good aeration and moisture retention, but it requires proper treatment to prevent rotting.
The selection of materials should be based on factors such as the amount of organic waste generated, available space, and personal preferences. Regardless of the material chosen, it is essential to ensure that the bin has adequate drainage and aeration to maintain a healthy environment for the worms.
Location
The location of your worm farm, whether indoors or outdoors, plays a crucial role in its success. Understanding the implications of each option will help you make an informed decision based on your specific circumstances.
-
Indoors (temperature-controlled):
Placing your worm bin indoors, such as in a basement or garage, offers greater control over temperature and protection from extreme weather conditions. This is particularly beneficial in regions with cold winters or hot summers, as worms thrive within a narrow temperature range (40-80F). However, indoor worm bins require careful monitoring of moisture levels and ventilation to prevent odor and mold growth.
-
Outdoors (protected from elements):
Outdoor worm bins can be placed in a shaded area of your garden or on a balcony. They benefit from natural temperature fluctuations and exposure to beneficial microorganisms in the soil. However, outdoor bins need protection from direct sunlight, heavy rain, and predators. Proper insulation may be necessary in cold climates to prevent the worms from freezing.
Ultimately, the best location for your worm farm depends on your climate, available space, and personal preferences. By considering the factors discussed above, you can choose the location that will optimize the health and productivity of your worms.
Size
The size of your worm farm is directly related to the amount of organic waste you generate. A larger bin will be necessary if you have a large household or produce a significant amount of organic waste. Conversely, a smaller bin may suffice if you have a smaller household or generate less waste.
The optimal size of your worm farm will also depend on the number of worms you intend to keep. As a general rule of thumb, you should provide one square foot of bin space for every pound of worms. This will give the worms enough room to move around and do their work.
If you are unsure of how much organic waste you generate, you can start with a smaller bin and gradually increase the size as needed. It is better to have a bin that is too small than one that is too large, as overcrowding can lead to problems such as poor aeration and excessive moisture.
Here is a table that provides some general guidelines on the size of worm bins based on the amount of organic waste generated:
| Amount of organic waste generated per week | Recommended bin size |
|---|---|
| Less than 1 pound | 5-gallon bin |
| 1-2 pounds | 10-gallon bin |
| 2-4 pounds | 20-gallon bin |
| More than 4 pounds | 30-gallon bin or larger |
These are just general guidelines, and the actual size of bin you need may vary depending on your specific circumstances. By considering the amount of organic waste you generate and the number of worms you intend to keep, you can choose the right size bin for your needs.
Bedding
When creating a DIY worm farm, the bedding material plays a crucial role in providing a suitable environment for the worms to thrive and efficiently break down organic waste. Shredded paper, cardboard, or straw are commonly used as bedding materials due to their ability to absorb moisture, provide insulation, and create air pockets for aeration.
The choice of bedding material depends on availability and personal preferences. Shredded paper is a widely accessible material that can be obtained from newspapers, magazines, or junk mail. Cardboard, while also readily available, should be torn into small pieces to prevent clumping. Straw is a natural and biodegradable option that provides good insulation, but it may need to be supplemented with other materials to improve moisture retention.
The ideal bedding material for a worm farm should meet the following criteria:
- Absorbent: The bedding should be able to absorb and retain moisture, providing a moist environment for the worms.
- Insulating: The bedding should provide insulation to regulate temperature fluctuations, especially in outdoor worm bins.
- Aerated: The bedding should create air pockets to ensure proper aeration and prevent anaerobic conditions.
- pH-neutral: The bedding should have a pH level close to neutral to avoid harming the worms.
By selecting an appropriate bedding material and maintaining its quality, you can create an optimal environment for your worms, promoting their health and productivity in breaking down organic waste.
| Bedding Material | Advantages | Disadvantages |
|---|---|---|
| Shredded paper | – Widely available- Absorbent- pH-neutral | – Can become compacted- May contain ink or dyes |
| Cardboard | – Readily available- Insulating- pH-neutral | – Needs to be torn into small pieces- Can be slow to decompose |
| Straw | – Natural and biodegradable- Provides good insulation- pH-neutral | – May need to be supplemented with other materials to improve moisture retention- Can attract pests |
Worms
The choice of worms is a crucial aspect of vermicomposting and directly tied to the success of your DIY worm farm. Among the various worm species suitable for composting, red wigglers (Eisenia fetida) stand out as the ideal candidates for several reasons:
- Voracious eaters: Red wigglers have an exceptionally high appetite and can consume large quantities of organic matter, efficiently breaking it down into nutrient-rich compost.
- Rapid reproduction: Red wigglers have a short reproductive cycle and can quickly multiply, ensuring a steady population in your worm farm.
- Hardiness: Red wigglers are relatively tolerant of environmental changes and can withstand a wider range of temperatures and pH levels compared to other worm species.
- Moisture tolerance: Red wigglers prefer moist environments but can adapt to fluctuating moisture levels, making them suitable for various composting systems.
In addition to these advantages, red wigglers are known for their ability to improve soil structure and fertility. The castings they produce are rich in nutrients and beneficial microorganisms, which can enhance plant growth and overall soil health.
Therefore, selecting red wigglers (Eisenia fetida) for your DIY worm farm is highly recommended. Their exceptional composting capabilities, combined with their hardiness and adaptability, make them the ideal choice for efficient organic waste decomposition and nutrient production.
| Characteristic | Red Wigglers (Eisenia fetida) |
|---|---|
| Appetite | Voracious eaters, consuming large quantities of organic matter |
| Reproduction | Rapid reproductive cycle, ensuring a steady population |
| Hardiness | Tolerant of environmental changes, including temperature and pH fluctuations |
| Moisture tolerance | Prefer moist environments but can adapt to varying moisture levels |
| Composting ability | Efficiently break down organic matter into nutrient-rich compost |
Food
In the context of DIY worm farming, the type of food provided to the worms plays a crucial role in their health, productivity, and the overall efficiency of the composting process. Fruit and vegetable scraps, coffee grounds, and tea bags are excellent sources of nutrients for worms and can be readily incorporated into their diet.
- Fruit and vegetable scraps: These scraps provide a rich source of vitamins, minerals, and carbohydrates for worms. Apples, bananas, carrots, and spinach are some examples of suitable fruit and vegetable scraps that can be added to the worm bin.
- Coffee grounds: Coffee grounds are a good source of nitrogen, which is essential for worm growth and reproduction. They also help to balance the pH level of the bedding material.
- Tea bags: Tea bags contain tannins, which have antimicrobial properties. Adding tea bags to the worm bin can help to suppress the growth of harmful bacteria and maintain a healthy environment for the worms.
It is important to note that while these food sources are beneficial for worms, they should not be provided in excess. Overfeeding can lead to an imbalance in the worm bin ecosystem and attract pests. A good rule of thumb is to provide just enough food to cover the top layer of the bedding material.
By providing worms with a varied and nutritious diet, you can ensure their optimal health and maximize the efficiency of your DIY worm farm.
Moisture
In the context of DIY worm farming, maintaining the proper moisture level is crucial for the health and productivity of the worms. Worms prefer a moist environment, but if the bedding becomes too soggy, it can lead to a lack of oxygen and the growth of harmful bacteria.
- Optimal moisture levels: Worms thrive in environments with moisture levels between 60% and 80%. This can be achieved by adding water to the bedding material as needed and monitoring its consistency. A handful of bedding material should feel moist, but not dripping wet.
- Consequences of overwatering: Excess moisture can lead to anaerobic conditions, where oxygen is depleted from the bedding. This can cause the worms to drown or suffocate. Additionally, overwatering can create an environment conducive to the growth of harmful bacteria and fungi, which can be detrimental to the worms’ health.
- Benefits of proper moisture: Maintaining the correct moisture level encourages the decomposition process and helps the worms to move freely through the bedding. It also prevents the bedding from becoming too dry and dusty, which can irritate the worms’ skin.
- Monitoring moisture levels: Regularly check the moisture content of the bedding by squeezing a handful. If it feels dry, add some water. If it feels too wet, allow the bedding to dry out for a few days before adding more moisture.
By understanding the importance of moisture balance and implementing proper moisture management practices, you can create an optimal environment for your worms to thrive and efficiently break down organic waste in your DIY worm farm.
Aeration
Aeration is a crucial aspect of a successful DIY worm farm. Worms require a constant supply of oxygen to breathe and thrive. Without proper aeration, the worms can suffocate and die. Holes or slits in the container allow for oxygen to flow into the bedding, ensuring that the worms have access to the oxygen they need.
The importance of aeration cannot be overstated. In a poorly aerated worm bin, the bedding can become compacted and anaerobic, creating an environment that is harmful to the worms. Anaerobic conditions can lead to the growth of harmful bacteria and fungi, which can cause disease and death in worms. Additionally, a lack of oxygen can slow down the decomposition process, resulting in a less efficient worm farm.
To ensure proper aeration, it is important to provide holes or slits in the container that houses the worms. These holes or slits should be large enough to allow for air to circulate, but not so large that the worms can escape. A good rule of thumb is to drill 1/4-inch holes every 6 inches around the sides of the container.
By understanding the importance of aeration and implementing proper aeration practices, you can create a healthy and productive environment for your worms in your DIY worm farm.
| Method | Benefits | Drawbacks |
|---|---|---|
| Holes drilled in container |
– Easy to implement – Provides good air circulation – Inexpensive |
– Worms may escape through holes – Holes can become clogged over time |
| Slits cut in container |
– Less likely for worms to escape – Provides good air circulation – Can be easily adjusted |
– May weaken the container – More difficult to implement than drilling holes |
| Air pump and diffuser |
– Provides excellent aeration – Can be automated – No risk of worms escaping |
– Requires additional equipment – Can be more expensive – May require regular maintenance |
Maintenance
Effective maintenance is pivotal in ensuring the success and sustainability of a DIY worm farm. It encompasses three key aspects: regular feeding, monitoring moisture, and harvesting castings. Each of these components plays a crucial role in maintaining a healthy environment for the worms, optimizing the decomposition process, and reaping the benefits of vermicomposting.
Regular feeding provides sustenance to the worms, enabling them to break down organic matter efficiently. The type and quantity of food should be carefully considered to avoid overfeeding, which can lead to imbalances in the worm bin ecosystem. Monitoring moisture levels is equally important, as worms require a moist environment to thrive. Overwatering can create anaerobic conditions that are detrimental to the worms’ health. Conversely, insufficient moisture can hinder their mobility and slow down the decomposition process.
Harvesting castings, the nutrient-rich byproduct of worm activity, is the ultimate goal of vermicomposting. Regular harvesting prevents the accumulation of excess castings, which can inhibit the worms’ movement and reduce their productivity. The harvested castings can be used as a valuable soil amendment, providing plants with essential nutrients and improving soil structure.
By understanding the importance of maintenance tasks and implementing them diligently, you can ensure the optimal functioning of your DIY worm farm, maximizing its efficiency in converting organic waste into nutrient-rich compost.
| Maintenance Task | Importance |
|---|---|
| Regular feeding | Provides sustenance to the worms, ensuring efficient decomposition of organic matter. |
| Monitoring moisture | Maintains a suitable environment for the worms, preventing both overwatering and insufficient moisture. |
| Harvesting castings | Removes excess castings, ensuring optimal worm movement and productivity, and provides a valuable soil amendment. |
FAQs on DIY Worm Farming
This section addresses frequently asked questions to provide comprehensive guidance on establishing and maintaining a successful DIY worm farm.
Question 1: What type of worms is best suited for vermicomposting?
Red wigglers (Eisenia fetida) are highly recommended for DIY worm farms. They possess an exceptional appetite, rapid reproduction rate, tolerance to environmental fluctuations, and adaptability to varying moisture levels, making them efficient composters.
Question 2: What is the ideal size for a DIY worm farm?
The appropriate size depends on the amount of organic waste generated. As a rule of thumb, provide one square foot of bin space for every pound of worms. Starting with a smaller bin and gradually increasing its size as needed is advisable.
Question 3: What materials are suitable for constructing a DIY worm farm?
Repurposed containers, cardboard, and wood are commonly used. Repurposed containers offer affordability and convenience, while cardboard provides insulation but requires frequent maintenance. Wooden bins are durable but necessitate proper treatment to prevent decay.
Question 4: How do I maintain optimal moisture levels in the worm bin?
Worms prefer a moist environment between 60% and 80% moisture content. Regularly check the bedding material; it should feel moist but not dripping wet. Adjust moisture levels by adding water or allowing the bedding to dry out as needed.
Question 5: What types of food can I feed my worms?
Fruit and vegetable scraps, coffee grounds, and tea bags are excellent sources of nutrients for worms. Avoid overfeeding to prevent ecosystem imbalances and pest attraction. Provide just enough food to cover the top layer of the bedding material.
Question 6: How often should I harvest worm castings?
Regularly harvesting castings prevents their accumulation, which can hinder worm movement and productivity. The frequency of harvesting depends on the size of the worm bin and the amount of organic waste processed. Aim to harvest castings every few months or when they comprise about one-third of the bin’s volume.
These FAQs provide essential information for establishing and maintaining a thriving DIY worm farm. By understanding these key considerations, you can create an optimal environment for your worms to efficiently transform organic waste into nutrient-rich compost.
Transition to the next article section: Exploring Advanced Techniques for Optimizing DIY Worm Farming
Tips for Optimizing Your DIY Worm Farm
Harnessing the power of vermicomposting in your DIY worm farm requires careful attention to specific aspects. Implement these tips to enhance the efficiency, sustainability, and overall success of your worm bin:
Tip 1: Provide Optimal Bedding
Shredded paper, cardboard, or straw make ideal bedding materials. They absorb moisture, insulate the bin, and create air pockets for proper aeration. Avoid using glossy or coated paper, as they can be harmful to worms.
Tip 2: Maintain Ideal Moisture Levels
Worms thrive in a moist environment, with moisture content between 60% and 80%. Check the bedding regularly; it should feel damp but not soggy. Adjust moisture levels by adding water or allowing the bedding to dry out as needed.
Tip 3: Feed Worms a Varied Diet
Worms relish fruit and vegetable scraps, coffee grounds, and tea bags. Avoid feeding them meat, dairy, or processed foods. Provide just enough food to cover the top layer of the bedding, and avoid overfeeding to prevent imbalances and attract pests.
Tip 4: Ensure Adequate Aeration
Holes or slits in the worm bin are crucial for oxygen flow. Without proper aeration, the bedding can become compacted and anaerobic, harming the worms. Drill holes or cut slits around the sides of the bin, ensuring they are large enough for air circulation but not too large for worms to escape.
Tip 5: Monitor Worm Population
Overcrowding can stress worms and reduce their productivity. Regularly check the worm population and separate excess worms into a new bin if necessary. Maintain a healthy balance between the number of worms and the size of the bin.
Tip 6: Harvest Castings Regularly
Worm castings are a valuable byproduct of vermicomposting. Harvest them every few months or when they comprise about one-third of the bin’s volume. Regular harvesting prevents compaction, maintains worm mobility, and provides nutrient-rich compost for your plants.
Tip 7: Control Temperature Fluctuations
Worms prefer temperatures between 55F and 77F (13C – 25C). Place the worm bin in a shaded area or insulate it during cold weather to maintain optimal temperatures.
Tip 8: Prevent Pests and Diseases
Keep the worm bin clean and free from pests by regularly removing uneaten food and excess moisture. Avoid using pesticides or chemicals in the bin, as they can harm the worms. If you notice any signs of pests or diseases, isolate the affected worms and treat them accordingly.
By incorporating these tips into your DIY worm farming practices, you can create a thriving ecosystem for your worms, optimizing the breakdown of organic waste and maximizing the production of nutrient-rich compost.
Conclusion
This comprehensive guide has explored the intricacies of “how to make a worm farm diy,” providing a detailed roadmap for establishing and maintaining a successful vermicomposting system. By embracing the principles outlined in this article, you can harness the power of worms to transform organic waste into nutrient-rich compost, promoting sustainability and reducing environmental impact.
The benefits of DIY worm farming extend beyond waste reduction. Vermicomposting enriches your garden soil, enhances plant growth, and fosters a healthier ecosystem. Its simplicity and affordability make it accessible to individuals and communities alike, empowering everyone to play a role in sustainable waste management.
Youtube Video: