Table of Contents
How to build a DIY worm farm kit? DIY worm farm kits are a great way to recycle food scraps and create nutrient-rich compost for your garden. They are relatively inexpensive to build and can be customized to fit your needs.
Editor’s Note: This DIY worm farm kit guide was published today because we know that many people are looking for ways to reduce their environmental impact. Vermicomposting is a great way to do this, and it’s also a fun and educational project for the whole family.
We’ve done the research and dug into the details, so you can make the best decision for your needs.
Key Differences or Key Takeaways
| Feature | DIY Worm Farm Kit |
|---|---|
| Cost | Relatively inexpensive to build |
| Customization | Can be customized to fit your needs |
| Environmental impact | Reduces your environmental impact |
| Educational value | Fun and educational project for the whole family |
Transition to main article topics
In this guide, we’ll cover everything you need to know about building a DIY worm farm kit, including:
- What materials you’ll need
- How to assemble your kit
- How to care for your worms
- How to harvest your compost
So what are you waiting for? Let’s get started!
DIY Worm Farm Kit
A DIY worm farm kit is a great way to recycle food scraps and create nutrient-rich compost for your garden. Here are eight key aspects to consider when building your own kit:
- Size: The size of your kit will depend on how much food scraps you generate. A good rule of thumb is to have a kit that is at least 2 cubic feet in size.
- Materials: You can build your kit out of a variety of materials, such as wood, plastic, or metal. Make sure that the materials you choose are durable and can withstand the elements.
- Drainage: Your kit needs to have adequate drainage to prevent the worms from drowning. You can drill holes in the bottom of your kit or add a layer of gravel to the bottom to help with drainage.
- Ventilation: Worms need oxygen to survive, so your kit needs to have adequate ventilation. You can add holes to the sides of your kit or cover the top of your kit with a mesh screen.
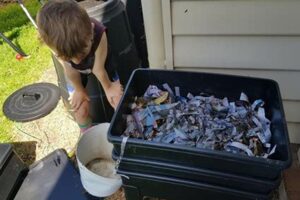
- Bedding: Worms need bedding to live in. You can use a variety of materials for bedding, such as shredded newspaper, cardboard, or straw.
- Food: Worms eat a variety of food scraps, such as fruits, vegetables, and bread. Avoid feeding your worms meat or dairy products.
- Moisture: Worms need their bedding to be moist, but not too wet. You can add water to your kit as needed to keep the bedding moist.
- Harvesting: You can harvest your compost once it is dark and crumbly. To harvest your compost, simply remove the lid of your kit and scoop out the compost.
By following these tips, you can build a DIY worm farm kit that will provide you with nutrient-rich compost for your garden for years to come.
Size
When it comes to DIY worm farm kits, size does matter. The size of your kit will depend on how much food scraps you generate. A good rule of thumb is to have a kit that is at least 2 cubic feet in size. A larger kit will be able to accommodate more food scraps and will produce more compost, but it will also require more space and maintenance.
- Larger kits are better for larger families or households that generate a lot of food scraps. They will also be able to produce more compost, which can be used to fertilize a larger garden or lawn.
- Smaller kits are better for smaller families or households that don’t generate as much food scraps. They will also be easier to manage and maintain.
- The size of your kit will also depend on the type of worms you choose to raise. Red wigglers, for example, are smaller than European nightcrawlers and can be raised in a smaller kit.
- No matter what size kit you choose, make sure that it has adequate drainage and ventilation. Worms need oxygen to breathe and will drown if the bedding is too wet.
By following these tips, you can choose the right size DIY worm farm kit for your needs.
Materials
The materials you choose for your DIY worm farm kit will depend on a number of factors, including the size of your kit, the type of worms you plan to raise, and your budget. Here is a brief overview of the different materials you can use:
- Wood: Wood is a popular choice for DIY worm farm kits because it is relatively inexpensive and easy to work with. However, wood is not as durable as some other materials, so it is important to choose a type of wood that is resistant to rot and decay, such as cedar or redwood.
- Plastic: Plastic is another popular choice for DIY worm farm kits because it is lightweight, durable, and easy to clean. However, plastic can be more expensive than wood, and it is not as environmentally friendly.
- Metal: Metal is the most durable material you can use for a DIY worm farm kit, but it is also the most expensive. Metal is also more difficult to work with than wood or plastic, so it is important to have some experience with metalworking before you attempt to build a metal worm farm kit.
No matter what material you choose, make sure that it is durable and can withstand the elements. Your worm farm kit will be exposed to rain, sun, and wind, so it is important to choose a material that can withstand these conditions without deteriorating.
Drainage
Drainage is essential for a successful DIY worm farm kit. Without proper drainage, the worms will drown in their own waste. There are two main ways to provide drainage for your kit: you can drill holes in the bottom of the kit, or you can add a layer of gravel to the bottom of the kit.
If you choose to drill holes in the bottom of the kit, make sure that the holes are small enough to prevent the worms from escaping. You should also make sure that the holes are not too close to the edges of the kit, as this could weaken the structure of the kit.
If you choose to add a layer of gravel to the bottom of the kit, make sure that the gravel is clean and free of debris. You should also make sure that the layer of gravel is thick enough to prevent the worms from burrowing into the soil below.
No matter which method you choose, make sure that your kit has adequate drainage. This will help to prevent the worms from drowning and will ensure that your kit is successful.
| Benefit of drainage | How it helps the DIY worm farm kit |
|---|---|
| Prevents the worms from drowning | Worms need oxygen to breathe. If the bedding is too wet, the worms will not be able to get the oxygen they need and will drown. |
| Helps to prevent the growth of mold and bacteria | Mold and bacteria can thrive in moist environments. If the bedding is too wet, mold and bacteria can grow and contaminate the worm bin. |
| Makes it easier to harvest the compost | When the bedding is dry, it is easier to separate the compost from the worms. This makes it easier to harvest the compost and use it in your garden. |
Ventilation
Ventilation is essential for a successful DIY worm farm kit. Worms need oxygen to breathe, and without adequate ventilation, they will suffocate. There are two main ways to provide ventilation for your kit: you can add holes to the sides of the kit, or you can cover the top of the kit with a mesh screen.
- Holes in the sides of the kit: This is the most common way to provide ventilation for a DIY worm farm kit. You can drill holes in the sides of the kit, or you can use a hole saw to cut out larger holes. The holes should be at least 1/4 inch in diameter, and they should be spaced evenly around the sides of the kit.
- Mesh screen on the top of the kit: Another way to provide ventilation for your kit is to cover the top of the kit with a mesh screen. The mesh screen should be fine enough to prevent the worms from escaping, but it should also be large enough to allow air to circulate. You can use a staple gun to attach the mesh screen to the top of the kit.
No matter which method you choose, make sure that your kit has adequate ventilation. This will help to ensure that your worms get the oxygen they need to survive and thrive.
Bedding
Bedding is an essential component of a DIY worm farm kit. It provides the worms with a place to live, and it helps to absorb their waste. Without bedding, the worms would be uncomfortable and their waste would quickly build up, creating an unhealthy environment for the worms.
There are many different materials that can be used for bedding in a DIY worm farm kit. Some common materials include shredded newspaper, cardboard, and straw. The best material to use will depend on the type of worms you are raising and the size of your kit.
For example, shredded newspaper is a good choice for small kits and for worms that are not very active. Cardboard is a good choice for larger kits and for worms that are more active. Straw is a good choice for kits that are located in cold climates, as it helps to insulate the worms.
No matter what material you choose, make sure that the bedding is clean and free of debris. You should also make sure that the bedding is moist, but not too wet. The bedding should be damp enough to provide the worms with moisture, but it should not be so wet that the worms are drowning.
Bedding is an important part of a DIY worm farm kit. By providing the worms with a comfortable place to live, you can help them to thrive and produce nutrient-rich compost for your garden.
| Benefit of bedding | How it helps the DIY worm farm kit |
|---|---|
| Provides the worms with a place to live | Worms need a place to live that is dark, moist, and protected from predators. Bedding provides the worms with all of these things. |
| Helps to absorb the worms’ waste | Worms produce a lot of waste, and bedding helps to absorb this waste. This helps to keep the worm bin clean and healthy. |
| Helps to regulate the temperature of the worm bin | Bedding helps to insulate the worm bin, which helps to regulate the temperature inside the bin. This is important for keeping the worms comfortable and healthy. |
Food
Feeding your worms the right food is essential for a successful DIY worm farm kit. Worms eat a variety of food scraps, but there are some foods that you should avoid feeding them, such as meat and dairy products.
- Fruits and vegetables: Fruits and vegetables are a great source of food for worms. You can feed your worms any type of fruit or vegetable, but some of their favorites include apples, bananas, carrots, and lettuce.
- Bread: Bread is another good source of food for worms. You can feed your worms any type of bread, but they especially like whole-wheat bread.
- Meat and dairy products: You should avoid feeding your worms meat and dairy products. These foods can make your worms sick and can attract pests to your worm bin.
By following these tips, you can ensure that your worms are getting the nutrients they need to thrive and produce nutrient-rich compost for your garden.
Moisture
Maintaining the right moisture level is crucial for a successful DIY worm farm kit. Worms require a moist environment to survive, as it helps them absorb nutrients and move around easily. However, excessive moisture can lead to drowning or the growth of harmful bacteria.
- Optimal Moisture Level: Worms thrive in bedding with a moisture content of around 60-80%. This level allows for efficient nutrient absorption while preventing waterlogging.
- Consequences of Overwatering: Excessive moisture can drown worms and create an anaerobic environment, leading to the production of harmful gases and attracting pests.
- Consequences of Underwatering: Insufficient moisture can dehydrate worms, hinder their movement, and reduce their ability to break down organic matter.
- Monitoring and Adjustment: Regularly check the moisture level of the bedding using a moisture meter or by squeezing a handful. Adjust the moisture by adding water or dry materials as needed.
By maintaining the appropriate moisture level in your DIY worm farm kit, you can ensure the well-being of your worms and optimize the composting process.
Harvesting
Harvesting is a crucial aspect of a DIY worm farm kit. It represents the culmination of the composting process, where the organic matter has been transformed into nutrient-rich compost ready for use in your garden or potted plants. The connection between harvesting and DIY worm farm kits is significant for several reasons:
- Completion of the Composting Cycle: Harvesting marks the completion of the composting cycle within the DIY worm farm kit. It signifies that the worms have successfully broken down the organic matter into a usable form.
- Obtaining Nutrient-Rich Compost: The harvested compost is a valuable resource for gardeners as it is rich in nutrients and beneficial microorganisms. It can be used to improve soil fertility, enhance plant growth, and reduce the need for chemical fertilizers.
- Sustainability and Environmental Benefits: Harvesting compost from a DIY worm farm kit promotes sustainability by diverting organic waste from landfills and reducing the use of synthetic fertilizers. It also contributes to a more circular and eco-friendly approach to gardening.
To successfully harvest compost from your DIY worm farm kit, it is essential to monitor the composting process and ensure that the compost is mature and ready for use. Signs of mature compost include a dark, crumbly texture, a pleasant earthy smell, and the absence of recognizable food scraps.
Harvesting compost from a DIY worm farm kit is a rewarding experience that provides numerous benefits for your garden, the environment, and your overall sustainability efforts. By understanding the importance of harvesting and following proper techniques, you can reap the rewards of nutrient-rich compost and contribute to a more sustainable and eco-friendly lifestyle.
FAQs on DIY Worm Farm Kits
DIY worm farm kits are a great way to recycle food scraps and create nutrient-rich compost for your garden. However, there are some common questions and concerns that people have about DIY worm farm kits. Here are six frequently asked questions and their answers to help you get started:
Question 1: Are DIY worm farm kits hard to build?
No, DIY worm farm kits are relatively easy to build. There are many different designs available online, and most of them can be built with simple materials and tools.
Question 2: What kind of worms should I use in my DIY worm farm kit?
Red wigglers are the most popular type of worm for DIY worm farm kits. They are easy to care for and they eat a wide variety of food scraps.
Question 3: How often do I need to feed my worms?
You should feed your worms once or twice a week. The amount of food you give them will depend on the size of your kit and the number of worms you have.
Question 4: How often do I need to harvest the compost?
You can harvest the compost once it is dark and crumbly. This usually takes about 3-6 months.
Question 5: What are the benefits of using a DIY worm farm kit?
DIY worm farm kits are a great way to reduce your environmental impact, recycle food scraps, and create nutrient-rich compost for your garden.
Question 6: Where can I find more information about DIY worm farm kits?
There are many resources available online about DIY worm farm kits. You can find information on how to build a kit, how to care for your worms, and how to harvest the compost.
Summary of key takeaways or final thought: DIY worm farm kits are a great way to reduce your environmental impact, recycle food scraps, and create nutrient-rich compost for your garden. They are relatively easy to build and maintain, and they can provide you with a steady supply of compost for your gardening needs.
Transition to the next article section: Now that you know more about DIY worm farm kits, you can decide if they are right for you. If you are interested in learning more about vermicomposting, there are many resources available online and in libraries.
DIY Worm Farm Kit Tips
DIY worm farm kits are a great way to recycle food scraps and create nutrient-rich compost for your garden. Here are five tips to help you get the most out of your DIY worm farm kit:
Tip 1: Choose the right size kit for your needs. The size of your kit will depend on how much food scraps you generate and how much compost you want to produce.
Tip 2: Use a variety of food scraps. Worms eat a wide variety of food scraps, including fruits, vegetables, bread, and coffee grounds. Avoid feeding your worms meat, dairy products, or citrus fruits.
Tip 3: Keep the bedding moist. Worms need a moist environment to survive. You can keep the bedding moist by adding water to the kit as needed.
Tip 4: Harvest the compost regularly. Compost is ready to harvest when it is dark and crumbly. You can harvest the compost by removing the lid of the kit and scooping out the compost.
Tip 5: Use the compost in your garden. Compost is a great way to improve the soil in your garden. You can use compost to fertilize your plants, improve drainage, and suppress weeds.
Summary of key takeaways or benefits: By following these tips, you can ensure that your DIY worm farm kit is successful and that you are able to produce nutrient-rich compost for your garden.
Transition to the article’s conclusion: DIY worm farm kits are a great way to reduce your environmental impact, recycle food scraps, and create nutrient-rich compost for your garden. By following these tips, you can ensure that your kit is successful and that you are able to enjoy the benefits of vermicomposting.
Conclusion
DIY worm farm kits are a great way to reduce your environmental impact, recycle food scraps, and create nutrient-rich compost for your garden. They are relatively easy to build and maintain, and they can provide you with a steady supply of compost for your gardening needs.
By following the tips in this article, you can ensure that your DIY worm farm kit is successful and that you are able to enjoy the benefits of vermicomposting. These benefits include reducing your environmental impact, recycling food scraps, and creating nutrient-rich compost for your garden.
Youtube Video: